Nifo Koula \ Gold tooth application
Couldn't load pickup availability
Gold Tooth Application Course /Nifo Koula
Our Gold Tooth Application Course is a specialized program that teaches you the advanced techniques required to professionally apply custom gold teeth (grills and crowns) using a strong bonding process. This course goes beyond our Tooth Gem Course, which focuses primarily on non-invasive tooth gem application, and covers the essential steps for successfully working with gold dental pieces.
What You Will Learn:
- Tooth Preparation: Learn how to clean and prime the natural tooth surface, creating the ideal foundation for the gold piece. This ensures a lasting and secure bond.
- Gold Piece Preparation: Understand the specific techniques required to prepare the gold tooth (crown or grill) for adhesion. This includes applying metal primer and ensuring the surface is prepped to receive the bonding agent.
- Adhesive and Primer Techniques: Master the use of metal prime and Universal adhesive to achieve a durable bond between the gold and the enamel. These products are not used in the Tooth Gem Course, as they are specific to bonding gold pieces.
- Cementation & Curing: Learn the proper cementation techniques, including how to apply resin cement and ensure the gold piece sets correctly with light curing. This process is more complex than the one used in tooth gem application, as gold pieces require a strong, long-lasting hold.
- Aftercare Advice: You’ll also gain expert knowledge on how to advise your clients on the proper aftercare for gold tooth applications to ensure the longevity of the piece.
How It’s Different From the Tooth Gem Course:
The Gold Tooth Application Course is a more advanced course compared to the Tooth Gem Course, as it involves working with gold dental pieces, which require specialized techniques, materials, and tools to ensure a secure, durable, and professional application.
- Materials: In this course, you’ll be using higher-grade materials such as metal primer and Universal bond as well as a completely different resin which are specifically designed for bonding gold to enamel. These materials are not included in the Tooth Gem Course.
- Techniques: The techniques in this course have different preparations and light curing and are more complex due to the nature of working with metal dental pieces. This requires a deeper understanding of bonding agents and curing times, which isn’t necessary for the simpler application of tooth gems.
- Product Set: You’ll receive 50g pumice 1x Metal Primer 1x 03 Bond A + B 1x composite and 1x 18kt Gold Cap (either in gold or white gold, depending on stock availability) as part of this course, ensuring you have the correct materials for professional application as well as a hard copy certificate .These items are an upgrade from the products provided in the Tooth Gem Course, where only basic bonding materials are included.
Why Additional Costs Apply:
The Gold Tooth Application Course includes premium materials and more advanced techniques, which naturally result in additional costs.
- The 18kt Gold Cap provided in the course allows you to practice with a real gold piece, ensuring that you learn the skills necessary to work with high-quality materials.
- The metal primer and adhesive are specifically formulated to ensure a strong, long-lasting bond with metal, which is crucial when applying gold teeth. These products are more expensive and specialized compared to those used for tooth gem applications.
- The additional training on advanced techniques, such as light curing, cementation, and mechanical locking, adds value and ensures your work is of the highest standard.
By completing this course, you’ll have the skills and knowledge to apply gold teeth professionally, offering a luxury service that requires both precision and the right materials
Care Instructions
Care Instructions
Preparation: Clean and dry your natural nails. Push back cuticles and lightly buff the nail surface.
Application: Choose the right size for each nail. Apply a thin layer of glue to both the press-on nail and your natural nail. Press and hold for 10-15 seconds.
Avoid Water: Refrain from soaking your hands in water for the first hour after application.
Daily Care: Be gentle with your nails. Avoid using them as tools to prevent lifting or breakage.
Removal: Soak nails in warm, soapy water for 10-15 minutes. Gently lift the edges and peel off. Use nail polish remover if needed.
Storage: Store unused nails in a cool, dry place to maintain their quality.
Returns
Returns
We have a 30-day return policy. Items must be unworn, unused, with tags, and in original packaging. Contact us at [email protected] to start a return. Returns sent without prior approval will not be accepted.
For exchanges, return the item and make a new purchase. Refunds will be processed within 10 business days of approval.
Sizing + Application
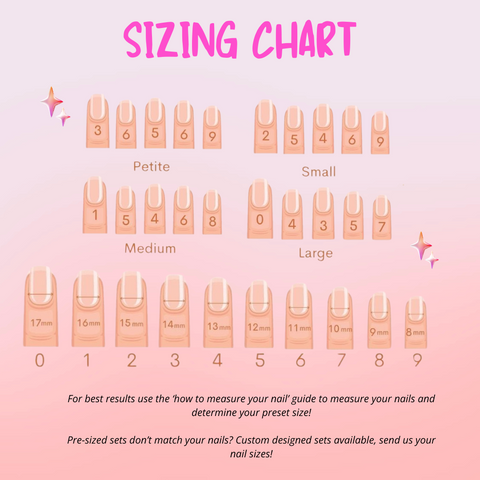
Sizing Chart:
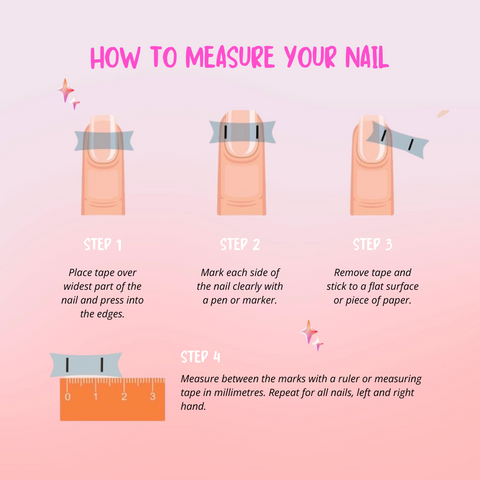
How to measure your nail:
Shape Guide:

Preparation: Clean and thoroughly dry your natural nails to ensure proper adhesion. Push back your cuticles to create a clean edge, and lightly buff the nail surface to remove any oils or residue.
Application: Select the correct size for each nail to ensure a snug fit. Apply a thin layer of nail glue to both the press-on nail and your natural nail. Carefully align the press-on nail with your cuticle, then press and hold firmly for 10-15 seconds to secure.
Avoid Water: For the first hour after application, avoid soaking your hands in water to allow the glue to fully set. This helps prevent lifting and ensures a longer-lasting hold.
Daily Care: Handle your press-on nails with care. Avoid using your nails as tools to open or pry items, as this can cause lifting or breakage. Regularly moisturize your hands and cuticles to maintain overall nail health.
Removal: When ready to remove, soak your nails in warm, soapy water for 10-15 minutes to loosen the glue. Gently lift the edges of the press-on nails and peel off carefully. If needed, use nail polish remover to dissolve any remaining glue residue.
Storage: Store any unused press-on nails in a cool, dry place to preserve their quality. Keep them away from direct sunlight and moisture to prevent warping or discoloration.